This article shows how to setup Elasticsearch Watcher in Elasticsearch to call an MVC controller in an ASP.NET 5 application. The controller action method will handle these events in part 3 of this blog series.
Code: https://github.com/damienbod/AspNet5Watcher
2015.09.20: Updated to ASP.NET Core 1.0 beta 7
2015.10.20: Updated to ASP.NET Core 1.0 beta 8
2015.11.18: Updated to ASP.NET Core 1.0 rc1
- Part 1: Settings up the ASP.NET 5 application for Elasticsearch
- Part 2: Using Elasticsearch Watcher to create data events
- Part 3: Visualizing Elasticsearch Watcher events using ASP.NET 5, SignalR and Angular
Creating the service for the watcher events
An MVC Controller is used to start and stop the Elasticsearch Watcher events and also handle the events which are received from the watch. The start and stop (delete action method because it deletes the watch) events do nothing more than call the SearchRepository which is responsible for the Elasticsearch logic. The CriticalAlarm action method checks if new critical alarms have been created and does nothing more at present.
using AspNet5Watcher.SearchEngine;
using Microsoft.AspNet.Mvc;

namespace AspNet5Watcher.Controllers
{
    [Route("api/[controller]")]
    public class WatcherEventsController
    {
        private SearchRepository _searchRepository;
        private static long _criticalAlarmsCount = 0;

        public WatcherEventsController(SearchRepository searchRepository)
        {
            _searchRepository = searchRepository;
        }

        //POST http://localhost:5000/api/WatcherEvents/CriticalAlarm HTTP/1.1
        [HttpPost]
        [Route("CriticalAlarm")]
        public IActionResult Post([FromBody]int countNewCriticalAlarms)
        {
            if (countNewCriticalAlarms != _criticalAlarmsCount )
            {
                var newCriticalAlarmsCount = countNewCriticalAlarms - _criticalAlarmsCount;
                _criticalAlarmsCount = countNewCriticalAlarms;
                // TODO use
            }

            return new HttpStatusCodeResult(200);
        }

        [Route("Start")]
        [HttpPost]
        public void StartElasticsearchWatcher()
        {
            _searchRepository.StartElasticsearchWatcher();
        }

        [Route("Delete")]
        [HttpPost]
        public void DeleteWatcher()
        {
            _searchRepository.DeleteWatcher();
        }
    }
}
Adding the start and delete Watcher buttons
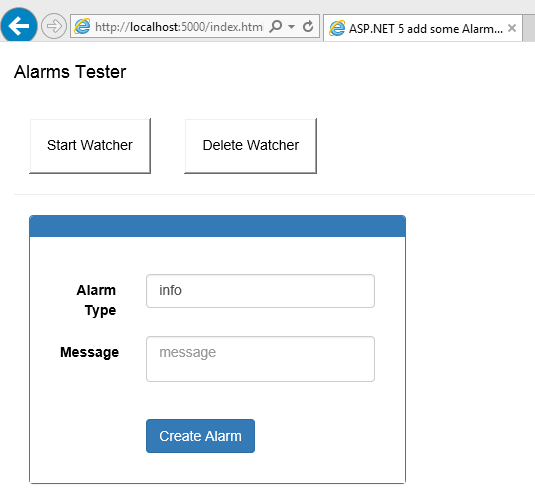
Now the UI can be implemented for the Elasticsearch watcher start and delete events. This is implemented using HTML and Angular. The HTML buttons are implemented in the createAlarms.html file inside the wwwroot/templates folder.
<input class="changeThemeButton" type="button" ng-click="Vm.StartWatcher()" value="Start Watcher" />
<input class="changeThemeButton" type="button" ng-click="Vm.DeleteWatcher()"  value="Delete Watcher" />
The two buttons call the StartWatcher and the DeleteWatcher methods implemented in the corresponding Angular controller, AlarmsController.js.
(function () {
	'use strict';

	var module = angular.module("mainApp");

	var AlarmsController = (function () {
	    function AlarmsController(scope, log, alarmsService) {
	        scope.Vm = this;

	        this.alarmsService = alarmsService;
	        this.log = log;

	        this.log.info("alarmsController called");
	        this.message = "Add an alarm to elasticsearch";

	        this.AlarmType = "info";
	        this.Message = "";
	    }

	    AlarmsController.prototype.CreateNewAlarm = function () {
	        console.log("CreateNewAlarm");
	        var data = { AlarmType: this.AlarmType, Message: this.Message, Id:"" };
	        this.alarmsService.AddAlarm(data);
	    };

	    AlarmsController.prototype.StartWatcher = function () {
	        console.log("StartWatcher event");
	        this.alarmsService.StartWatcher();
	    };

	    AlarmsController.prototype.DeleteWatcher = function () {
	        console.log("DeleteWatcher event");
	        this.alarmsService.DeleteWatcher();
	    };


	    return AlarmsController;
	})();

    // this code can be used with uglify
	module.controller("alarmsController",
		[
			"$scope",
			"$log",
			"alarmsService",
			AlarmsController
		]
	);
})();
The Angular controller uses the AlarmsService to send the HTTP POST requests to the MVC controller. This is implemented using the Angular $http service.
(function () {
    'use strict';

	function AlarmsService($http, $log, $q) {
	    $log.info("alarmsService called");

	    var AddAlarm = function (alarm) {
	        var deferred = $q.defer();

	        console.log("addAlarm started");
	        console.log(alarm);

	        $http({
	            url: 'api/alarms/AddAlarm',
	            method: "POST",
	            data: alarm
	        }).success(function (data) {
	            deferred.resolve(data);
	        }).error(function (error) {
	            deferred.reject(error);
	        });
	        return deferred.promise;
	    };

	    var StartWatcher = function (alarm) {
	        var deferred = $q.defer();

	        console.log("StartWatcher begin");
	        console.log(alarm);

	        $http({
	            url: 'api/WatcherEvents/Start',
	            method: "POST",
	            data: ""
	        }).success(function (data) {
	            deferred.resolve(data);
	        }).error(function (error) {
	            deferred.reject(error);
	        });
	        return deferred.promise;
	    };

	    var DeleteWatcher = function (alarm) {
	        var deferred = $q.defer();

	        console.log("DeleteWatcher begin");
	        console.log(alarm);

	        $http({
	            url: 'api/WatcherEvents/Delete',
	            method: "POST",
	            data: ""
	        }).success(function (data) {
	            deferred.resolve(data);
	        }).error(function (error) {
	            deferred.reject(error);
	        });
	        return deferred.promise;
	    };

		return {
		    AddAlarm: AddAlarm,
		    StartWatcher: StartWatcher,
            DeleteWatcher: DeleteWatcher
		}
	}

	var module = angular.module('mainApp');

	// this code can be used with uglify
	module.factory("alarmsService",
		[
			"$http",
			"$log",
            "$q",
			AlarmsService
		]
	);

})();
Installing Elasticsearch and Elasticsearch Watcher
Before the SearchRepository class can be implemented, Watcher needs to be installed on your Elasticsearch instance. If you have a cluster setup, it needs to be installed on each instance. You can download Watcher from here and install as per documentation.
Adding a new watcher event and delete the event
The SearchRepository class creates a new watch inside Elasticsearch and also deletes the watch when required. At present Elasticsearch NEST Watcher does not support the latest version of Elasticsearch Watcher, so for this demo, I have used a basic HttpClient to create and delete the watch. I will replace both these implementations as soon as the new version of NEST Watcher is released.
The Watcher will be created as follows:
http://localhost:9200/_watcher/watch/critical-alarm-watch

Accept: application/json
Content-Type: application/json
Host: localhost:9200
Content-Length: 827
Connection: Keep-Alive

{
  "trigger" : {
    "schedule" : {
      "interval" : "10s"
    }
  },
  "input": {
    "search": {
      "request": {
        "body": {
          "query": {
            "term": {
              "alarmType": {
                "value": "critical"
              }
            }
          }
        }
      }
    }
  },
  "condition": {
    "always": {}
  },
  "actions": {
    "webAction": {
      "webhook": {
          "port": 5000,
          "host": "localhost",
          "path": "/api/WatcherEvents/CriticalAlarm",
          "method": "post",
          "headers": {
            "Content-Type": "application/json;charset=utf-8"
          },
          "body": "\"{{ctx.payload.hits.total}}\""
      }
    }
  }
}
The watch is called critical-alarm-watch. The watch checks every 10 seconds to search for critical alarms. The watcher then sends the total found critical alarms to the MVC application using a webhook and sends the payload total in the body. This of course could be optimized by using a better search and only sent if new alarms have been logged.
The HTTP POST is sent using Elasticsearch NEST Watcher.
public void StartElasticsearchWatcher()
{
	var header = new Dictionary<string, string>();
	header.Add("Content-Type", "application/json;charset=utf-8");

	var response = client.PutWatch(CRITICAL_ALARM_WATCH, p => p
		.Trigger(t => t
			.Schedule(s => s
				.Interval("10s")
			)
		)
		.Input(i => i
			.Search(s => s
				.Request(r => r
					.Body<AlarmMessage>(b => b
						.Query(q => q.Term(qt => qt.AlarmType, "critical"))
					)
				)
			)
		)
		.Condition(c => c.Always())
		.Actions(a => a.Add("webAction",
			new WebhookAction
			{
				Method = HttpMethod.Post,
				Host = "localhost",
				Port = 5000,
				Path = "/api/WatcherEvents/CriticalAlarm",
				Headers = header,
				Body = "\"{{ctx.payload.hits.total}}\""
			}
		))
   );
}
The Delete code is also implemented using the NEST.WATCHER. This just deletes the watch using a HTTP REQUEST DELETE.
public async void DeleteWatcher()
{
   await client.DeleteWatchAsync(new DeleteWatchRequest(CRITICAL_ALARM_WATCH));
}
Now the application can be tested. Start the application and click the Start Watcher button. This creates a new watch.
This can be viewed using the _watcher/stats GET request. You should have at least one watch now.
http://localhost:9200/_watcher/stats?pretty
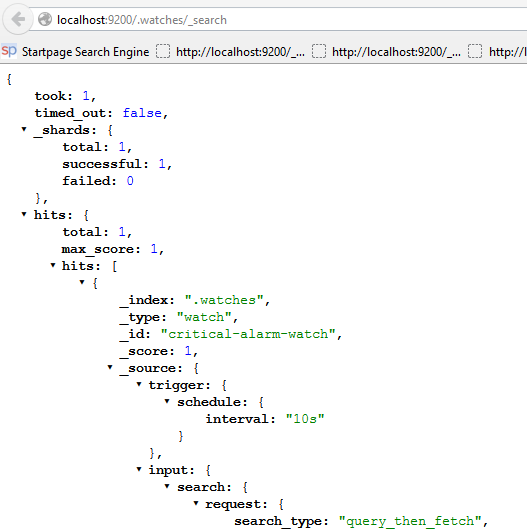
Or for more details you can use the .watches/_search
http://localhost:9200/.watches/_search
You can also view the watch history using the .watch_history*
http://localhost:9200/.watch_history*/_search?pretty
If a break point is set on the CriticalAlarm action method inside the WatchEventsController, you will see the Watcher event, with the actual number of critical alarms.
Now create a critical alarm. This adds a critical alarm document to Elasticsearch.
The amount of critical alarms received in the watch event has increased.

The Watcher is up and running with MVC 6. Next step is to display the alarm events in the UI. This will be done in part 3 of the series.
Links:
https://www.elastic.co/guide/en/watcher/current/index.html
http://amsterdam.luminis.eu/2015/06/23/first-steps-with-elastic-watcher/
https://github.com/elastic/elasticsearch-watcher-net
https://www.elastic.co/guide/en/watcher/current/actions.html#actions-index


Reblogged this on Dinesh Ram Kali..
can you please mail me the watcher licenced plugins, I tried with site, but it is not working for me, I am trying the setup on windows machine
I just downloaded the watcher from elastic.co and followed these instructions:
https://www.elastic.co/products/watcher
https://www.elastic.co/guide/en/watcher/current/getting-started.html
I only have a trail license. You need to give an email address and Elastic will supply a license in an email. Watcher is part of the subscriptions. I don’t know if open source projects, products can use this for free.
Greetings Damien
About it ElasticSearch, any step-by-step guide, or Getting Started – Quick Start that can be completed in 15-20 minutes?
I get you a good step-by-step guide sample like https://berniecook.wordpress.com/2013/01/13/getting-started-with-git-and-visual-studio-step-by-step-guide/
… I wanted to quickly cover off several assumptions before we get started: install (requisites, tools required), configure, an running quickly. Target will be an “go and ready” sample. Maybe better an real application sample
Mindly notes:
Any good getting started with ElasticSearch? step by step in 10 minutes?
IMHO, better samples for minimize learning curve are real applications with full source code and good patterns and practices
Full source code sample REAL application? not Demo, only real applications?
Like for small to medium applications development, but open source, if you can sharing or maybe another real project or production-ready application using.
main influences, are full of innovative ideas that can free our minds to explore new techniques, patterns and paradigms.
You want to use technologies that allow for rapid development, constant iteration, maximal efficiency, speed, robustness and more. You want to be lean and you want to be agile. You want to use technologies that will help you succeed in the short and long term. And those technologies are not always easy to pick out.
Thanks a lot for your big efforts.